Hi everyone! You all should have recieved a packet from the training in your email. If you didn't, please let me know. Or, click here: bit.ly/AprilTrainingPacket
Here's a link to the booklist: bit.ly/DavisBookList
This will be the updated version if any books get added.
Below is video and recap from the training, as well as some more in depth re-visiting of rhythmic notation.
Hello Music Students
I didn't get video of this at the training, but if you go to this post and scroll to the last video, you'll see Jeanette Eggett in action.
How To Speak Moo
Here's How to Speak Moo, taught by Shanda Stenger, part 1:
and How to Speak Moo, part, 2.
I'm guessing some of you will want to buy a cow puppet. I went to Amazon and did a quick search, and this puppet was $8.68 and looks a lot like the one Shanda used.
Also, here's a link to purchase the book, How to Speak Moo.
Shanda did a fabulous job. Thank you so much!
The First Music
Here's video of The First Music.
If you want to buy the book, click on this link.
Click here to buy a guiro frog.

I decided to rework the rhythmic notation process from how I did it at the training becuase I wanted it to be more accessible and easy to use. There's usually not one right way to do a given thing, and this definitely holds true for writing down notation. Below I'm going to go through a few different ways of composing or dictating a rhythm for an existing text.
EASIEST, options are more limited
I should have explained the notation could be done one syllable at a time, just like we did with the pitches. The pros of this is that is lends to more success if you aren't confident in deriving rhythms. It's proabably the easiest way to compose a rhythm. The cons are that it might not lend itself as well to falling within natural syllabic emphasis. You just might have to do more adjusting to get it to lend itself to natural syllabic emphasis.
Step 1: write down words
Step 2: Choose durations for each word, starting at the beginning, one or two syllables at a time.
Step 3: Check as you go, and adjust as necessary.
Here's an example of the notating rhythm following the same process we used to notate the pitches.
A LITTLE MORE ADVANCED, lends to more options
This is notation derived from speech, using beat maps. The pros of this method are that it allows for more authentic rhythms, and its approachable and a great way for students to learn to derive or dictate rhythms. The challenge to this method is that the student has to have a little more knowledge to be successful (and the teacher), but this is good in that it gets at a deeper level of thinking.
Here's a link to download a beatmap: click here
Step one: clap or tap your rhythm
Step 2: Tap the beat while speaking your rhythm
Step 3: Place dots within each beat to represent the number of sounds in each beat
Step 4: check. How many beats? How many sounds? Does it match up?
Step 5: Turn your dots into notes by adding stems
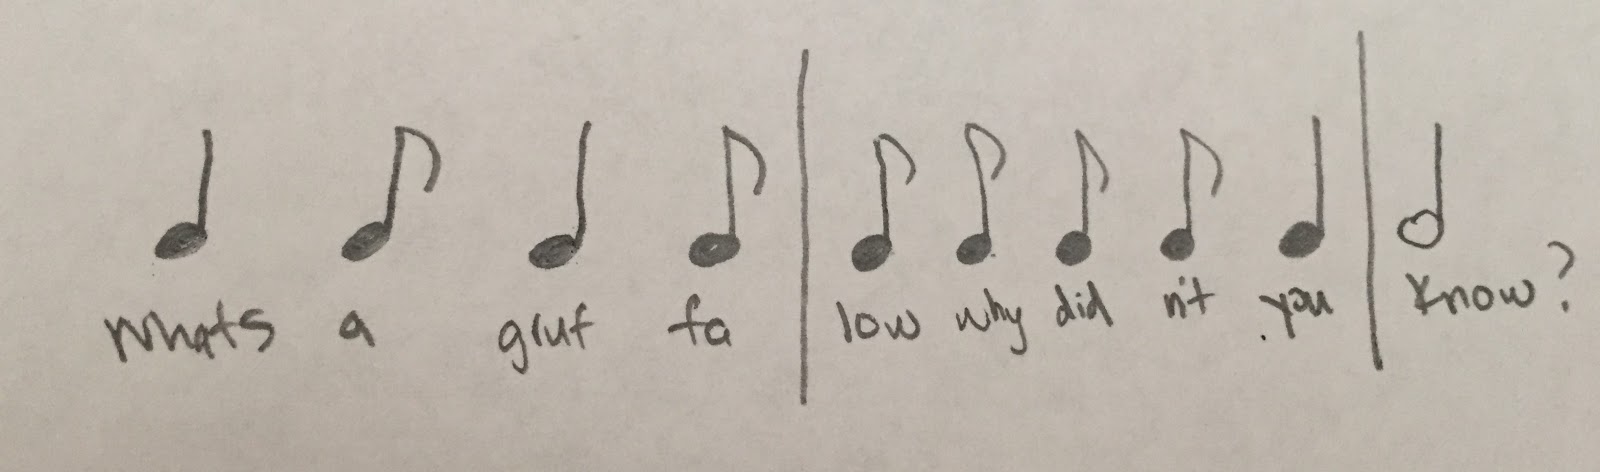
SUSANS FABULOUS RHYTHM
I was determined to get this rhythm! I was really overthinking it at the training, and I want you all to know it was doable!
Because we weren't sure of the time signature, or even the smallest unit of beat, we needed to first determine the smallest unit of beat and work from there.
Here's a video of me going through the process.
Step one: draw dots for the smallest unit of sound in your rhythm.

Step 2: connect the dots that share a word within your rhythm, (This is how you know how short or long each note will be in relation to the other notes.)

Step 3: Add stems. Write in the words, then tie the notes that are more than one sound.


Step 4: Translate ties into single notes.

You could be done here, if you want. This is enough to have a written record and recreate the rhythm later on.
Step 5: figure out your strong beats and time signature. I actually came up with a few solutions for this rhythm.
Here, I just divided the rhythms above in half. I felt like this fit better becuase it was such a fast rhythm.

Figure out where your strong beats are, and how you want to group your notes into measures.
I like 6/8 time best for this rhythm. It feels the most natural.

Step 6: Check your work.
Point to your rhythm. Speak and tap it. Adjust as needed.
I wanted to be more than double sure I figured this out correctly, so I put the rhythm into my notation program and had it play back for me.
Here are all the rhythms I considered put into my notation program. They all played back exactly the same, but the 6/8 time signature makes the most sense to me.
The first rhythm below is how I started at the training, but I got confused when the feel switched from duple (sounds grouped into 2) to triple (sounds grouped into 3) meter. I feel like the last two choices below indicate the difference in feel between triple and duple the best, and the last is less complicated (in my opinion) because it stays in one time signature.

composing melody
Below is video from the training of the process for adding pitches to a rhythm. I should have pulled out an instrument from the beginning, to show you how that could be done. If you're not comfortable singing the pitches like we did in the training, just use a barred instrument and play the pitches, or boomwhackers, then sing what you play.
Using barred instruments (or boomwhackers) lends itself really well to letting the students compose melodies in small groups or on their own. Just let them use instruments with only the notes you want them to use.

If you don't have barred instruments already, or if you are on a cart and want something more portable, I love these resonator bells.
If you would like to leave feedback from the training, here's the link. http://goo.gl/forms/Oytuojt7On
Thank you!
Thank you!
No comments:
Post a Comment